Saturday, July 7, 2012

Horse mackerel with tomato and jalapeno pepper

Before I forget, I`d like to inform my non-blogger and/or non-Gmail user readers who told me that they have difficulties in putting comments on my blog. If you`re one of them, don`t worry. To leave a comment, you don`t need to have a blog, or a Gmail account, or any account whatsoever. If you don`t find the comment form, that probably because you`re on the Home page, not on the post page. So, all you have to do is click the title of the post on top of the post or x comment(s) at the bottom of the post. Clicking them will bring you to a single-post page. Keep scrolling down and you`ll find a comment form at the end of the page. I`d really appreciate if you can leave your name (real name, nick name, initials, but preferably not anonymous) because it`ll be easier for me to refer you in my reply later. I`m pasting this info to my About page now right on top on how to follow my blog. If you`re new to this blog, you might want to start from there first.
Hope this helps and I can`t wait to hear from you!

Now let`s have our food talk.
It`s been a while since I posted fish recipes, so today I`d like to share one using horse mackerel or "aji" in Japanese. I usually buy the ready-to-use butterflied aji, which is very easy to find at our nearby stores, because handling fish from scratch still won`t budge from my to-avoid list.
Anyway, since this dish was for our Saturday`s brunch where I wasn`t even sure if I was fully awake when I made it, it won`t take rocket science to whip it up within 30 min assuming that you use ready-to-use fish or fish fillet. After all, I know nothing about rocket, anyway. 

Here`s the fish where they are already cleaned and butterflied. But I rinsed them again and patted dry with kitchen paper.

Lightly dust the fish with corn starch to help it crisp up and hold its shape during frying later.

And by frying, I mean add a bit of olive oil on a frying pan over medium heat and put the starch-coated fish there.
I love hearing something sizzling on Saturday morning. Anytime before 12 is morning, right?

When the fish has turned white and curled in, set them aside on a plate. 
The chars were unintentional and I love how they made the grilly look on the fish.
I won`t blame you if you add salt to the fried fish and then..poof! They`re gone. It`s not your fault.

But if you can hold yourself a bit, here`s a little extra work Parsley, cherry tomatoes, and lemon.
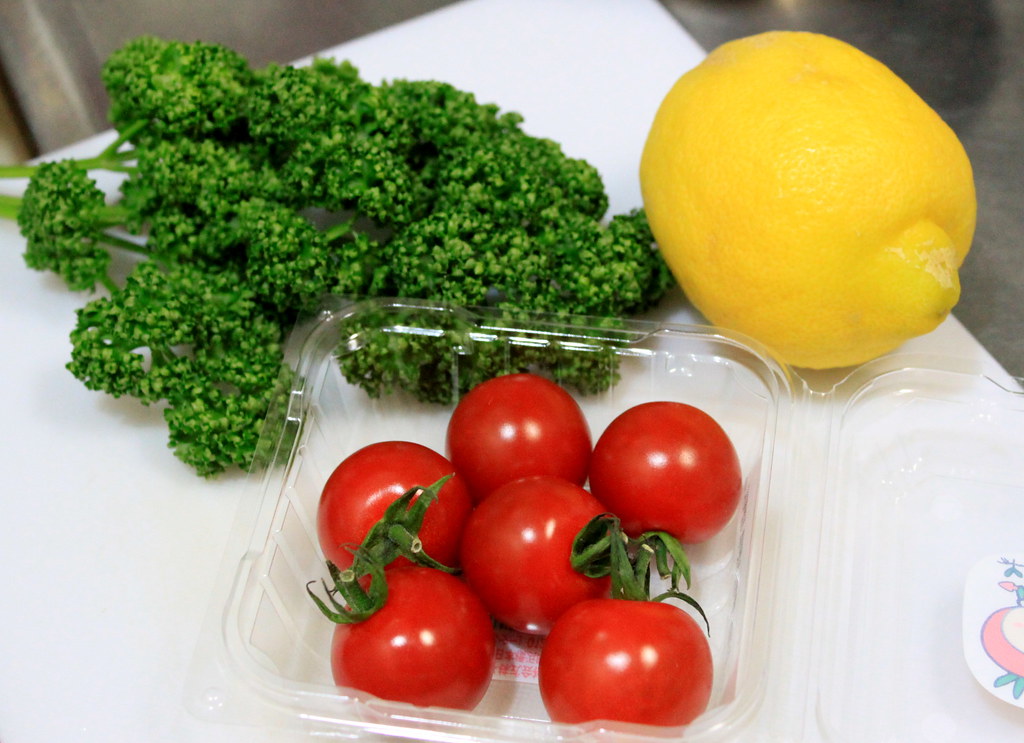
Those colors are what my eyes need to open up. I feel healthy already just looking at them.

Chop up parsley and tomato, but leave a few whole tomatoes for serving later. Stir in olive oil and squeeze in lemon juice. Add the zest too if you want. Throw in sliced pickled jalapeno peppers and season with salt and black pepper.
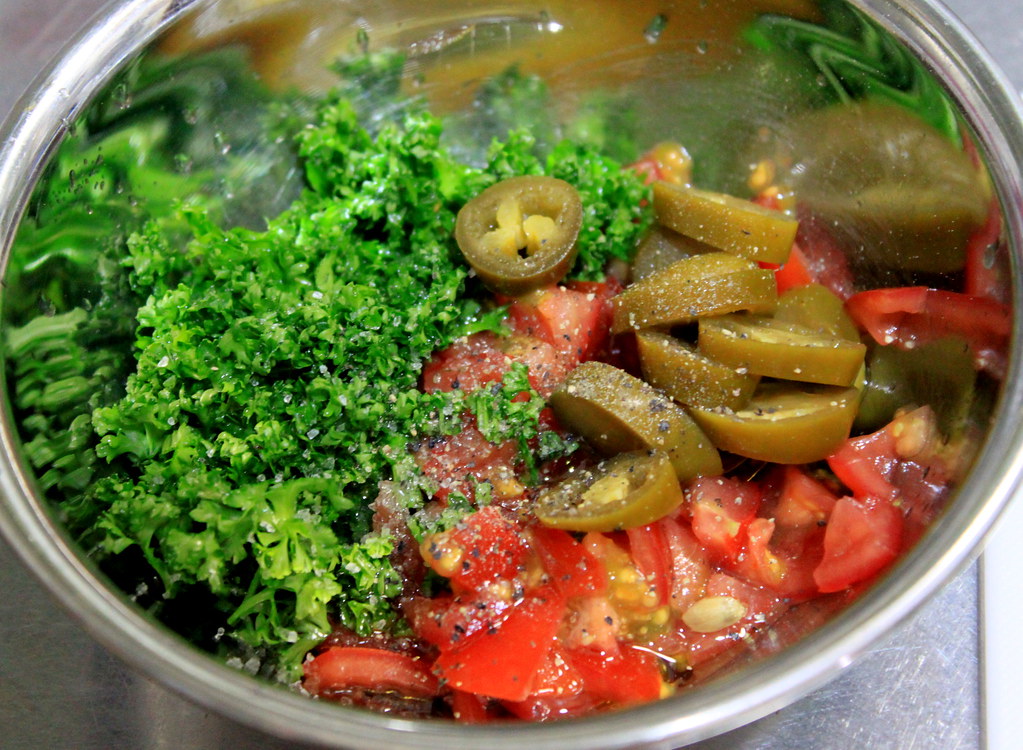
Stir everything to combine and adjust the seasoning to your liking. When you`re done, add it to the fried fish you prepared earlier.

The fish is crispy on the outside but still juicy inside and the addition of sweet-tangy-hot salsa will make you chew them up quicker and add more on your plate. My husband enjoyed this with a plate of rice, but I wish I had some baked potatoes that day. It seems like I have to recreate this soon!
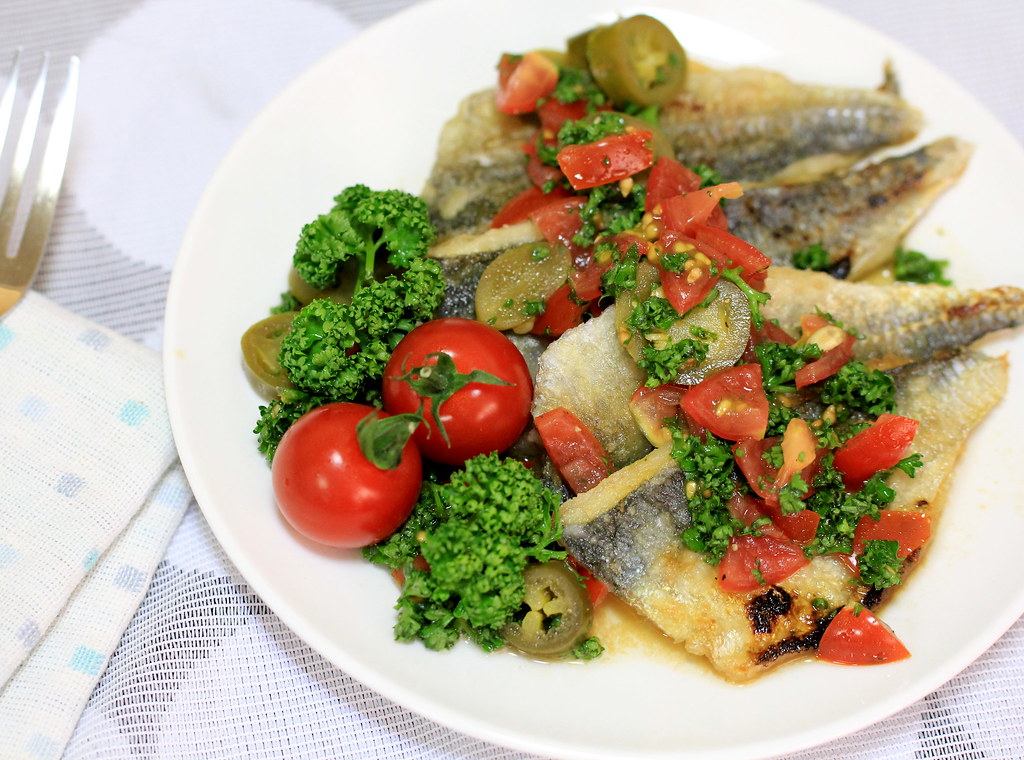
HORSE MACKEREL WITH TOMATO AND JALAPENO PEPPER
Serves two persons

Ingredients:
4 horse mackerel, cleaned and butterflied
1-2 Tbs corn starch for dusting
1 cup chopped cherry tomatoes
2-3 whole cherry tomatoes
2 Tbs lemon juice
1 cup chopped parsley
3 Tbs sliced pickled jalapeno pepper
1 Tbs olive oil
Salt
Black pepper

Method:
1. Clean and butterfly horse mackerel. Lightly rinse and pat dry with kitchen paper.
2. Lightly dust the fish with corn starch.
3. Add a bit of olive oil on a frying pan over medium heat and fry the fish.
4. When the fish has turned white and curled in, set them aside on a plate. 
5. In a bowl, stir chopped parsley and tomato, olive oil, lemon juice (add the zest too if you want), and sliced jalapeno pepper. 
6. Season with salt and black pepper. 
7. Serve the fish with the tomato and jalapeno salsa. 

Wednesday, July 4, 2012

Tokyo Banana Tree

It`s late now, but my eyes are still wide opened and I`m too awake to be sleepy. So, I guess I`d better use my energy to post something here because I happen to have something unusual to show you. One thing got my full attention when I came to Japanese stores was the vast options of baked goods and food specialties that are meant for souvenirs. But what impressed me most was the visual presentation. The food itself looks already delightful on its own, but the packing brings it to a higher level in aesthetic department. It`s obvious that in Japanese culture, you enjoy the food with your eyes before you actually eat it. And when we want to bring them as souvenirs or presents, the visual gorgeousness surely add up the whole happiness for both sides. Although environmentally speaking I`m not too keen on the individual packaging, especially for the bite-sized cakes or cookies, sometimes I think it comes in handy under some circumstances.

So, the coffee table in our laboratory is often filled with some food specialties brought as souvenirs (called "omiyage or お土産" in Japanese). As usual, they`re usually pretty and neat. But this one was very interesting that once I saw it, I brought one home because I knew I just had to take some pictures of it.
If you come to Japan, chance is you`d hear about Tokyo Banana and you`d probably won`t leave Japan without bring some home with you. Alright, I`m a little exaggerating here, but the point is, it`s super famous. It`s actually a banana-shaped banana sponge cake with bananaey custard filling. But recently, with the opening of Tokyo`s SkyTree, the Tokyo Banana maker released Tokyo Banana Tree with Choco Banana custard filling...with leopard printing on the cake!

I`m definitely not into leopardy stuff (because honestly, I`m so much more into cows!) and I really have no idea how the leopard connects with the banana or cake. If you have some info on it, please share with us here because I`m so intrigued right now.

Is this art giving you some new ideas for your next kitchen projects already?

Done with the outside. Now the inside.
The thick custard had a quite strong accent of banana, although I wish the chocolate flavor stood out more. But generally, you won`t disappoint anyone with presents like this :)

Now I`m getting hungry and I think I want to grab a banana (the fruit, not the cake) before going to bed.
Nite nite!

Tuesday, June 26, 2012

Green tea and chocolate soy ice cream

This Sunday I`m going to take an exam for Japanese language proficiency and I`m supposed to meditate s-t-u-d-y, like right now. I was studying, but then my husband offered me to have a cup of ice cream I made this weekend (again!) and just like that, I`m now much more interested in sharing about it with you.So, it will be his fault if I end up abandoning my textbooks tonight.

Ice cream talk now. I`ve been wondering why I can`t find ice cream made of soy milk here in spite of the various products of plain soy milk or the flavored ones. I`ve learned that when the food I want is not available at the stores, or is not affordable for me, that means either I just forget about it or make it myself. Obviously, with my new toy in the kitchen, I did the latter one. Another reason why I make my own ice creams is I can adjust, aka. reduce the sweetness. I don`t actually often buy ice creams (or the popular Japanese soft cream) because I always find they`re too sweet for me. If you follow my recipe here and find that it`s not sweet enough for you, feel free to adjust the sweetness.
Just for a reminder, in making ice creams, I still don`t cook/heat anything and I don`t add eggs. 

Start with dissolving the matcha (green tea) powder with soy milk gradually in a container. 

The mixture will be frothy at first, but that`s alright.

While dissolving the matcha powder, stir honey or sugar in.
Add the remaining soy milk and pour the whole mixture to a different container while pushing it with the back of a spoon through a sieve repeatedly until no lumps are visible.
Taste it, stir in more honey or sugar if necessary, and add a pinch of salt.  When you`re done, chill the mixture in the refrigerator 2-3 hours.

After the mixture is chilled enough, start churning it in an ice cream maker. 

..until it has turned thick.
Transfer the ice cream to a container and keep it in freezer for 2-3 hours.

Shouldn`t I be studying now?I can feel the books staring at me. Ugh.

Alright, to shorten this post, this is the chocolate soy ice cream that I made the next day. The method is pretty much the same, only this time I used cocoa powder.

This is how I kept the ice creams in one container.

 And I didn`t do this on purpose.

Scooping time! 
I`m sorry for showing you this green-brown messiness, but in my defense, the messiness is my signature.

Creaminess-wise, this soy ice cream is somewhere between sorbets and dairy cream-based ice creams. Much lighter than the regular ice creams, but still "creamier" compared to sorbets. It has a soft crunchy texture that might bring sorbets to mind, but the milkiness of the soy ice cream might make the difference.
I remember how I can feel the sweet stickiness remaining in my mouth when I eat the regular ice cream, which I don`t find in this soy ice cream. It melts and it`s gone very quickly. I don`t know if this is good or bad, but if you`re looking for a lighter version of ice cream like me, then this one is probably for you.
Enjoy!
MATCHA (GREEN TEA) SOY ICE CREAM
Makes about 500 ml

Ingredients:
1 1/2 Tbs matcha (green tea) powder
450 ml plain soy milk
4 Tbs honey
A pinch of salt

CHOCOLATE SOY ICE CREAM
Makes about 500 ml

Ingredients:
3 Tbs cocoa powder
450 ml plain soy milk
6 Tbs honey
A pinch of salt

Method:
1. Dissolve matcha or cocoa powder and honey gradually with soy milk in separate containers.
2. Pour the mixture through a sieve repeatedly until no lumps are visible.
3. Add a pinch of salt, stir a bit, and chill in the refrigerator for 2-3 hours.
4. Churn all the ingredients in an ice cream maker according to the manual for 30 minutes or until the mixture has thickened up.
5. Transfer the ice cream to a freezing container and keep it in the freezer for another 2-3 hours before serving.
Note: If using only one freezer bowl, make the ice cream one flavor a day.